Today I want to share with you something I’ve been doing in the last couple of days. The lock down measures for COVID-19 and some free time brought me to tinker a bit with my Raspberry Pi4.
The project Rosetta@home allows people to give compute power to scientists for designing new proteins. The compute power could come from any device: a laptop, a desktop, a server and even a portable device.
Recently I bumped into the news of running Rosetta@home on aarch64 (arm64) hardware and, in my case, on my new and shiny Raspebrry Pi4.
In theory what you need is:
$ sudo apt-get update
$ sudo apt-get install boinc-client boinctui
A good write-up could be found here
While I was setting it up I found few “issues”. Hopefully they could save you some time.
Rosetta doesn’t work on Raspbian
If you own a Raspberry Pi4, I’m sure you’ll have a Raspbian based system. It runs without
any problem but unfortunately it is not suitable for running Rosetta@home.
Although the hardware supports 64-bit, Raspbian is a 32-bit OS and this means
it cannot run 64-bit applications.
Solution: install a 64-bit distribution.
Ubuntu officially supports Raspberry
Pi4. Download the 64-bit version from here or follow this tutorial from
Ubuntu
I had issue with WiFi module hence reverted to wired connection!
The SD card is a bit slow.
Although SD cards nowadays are fast, they are slower than HDD/SDD and when you
run high I/O computations on them, they could fail fairly quick.
Solution: move the root file system out from the SD card to an external hard
disk.
I had a 1TB portable one and it works like a charm.
It’s not that straightforward to move the root file system to an external disk
but it’s a doable. What you need is a good guide
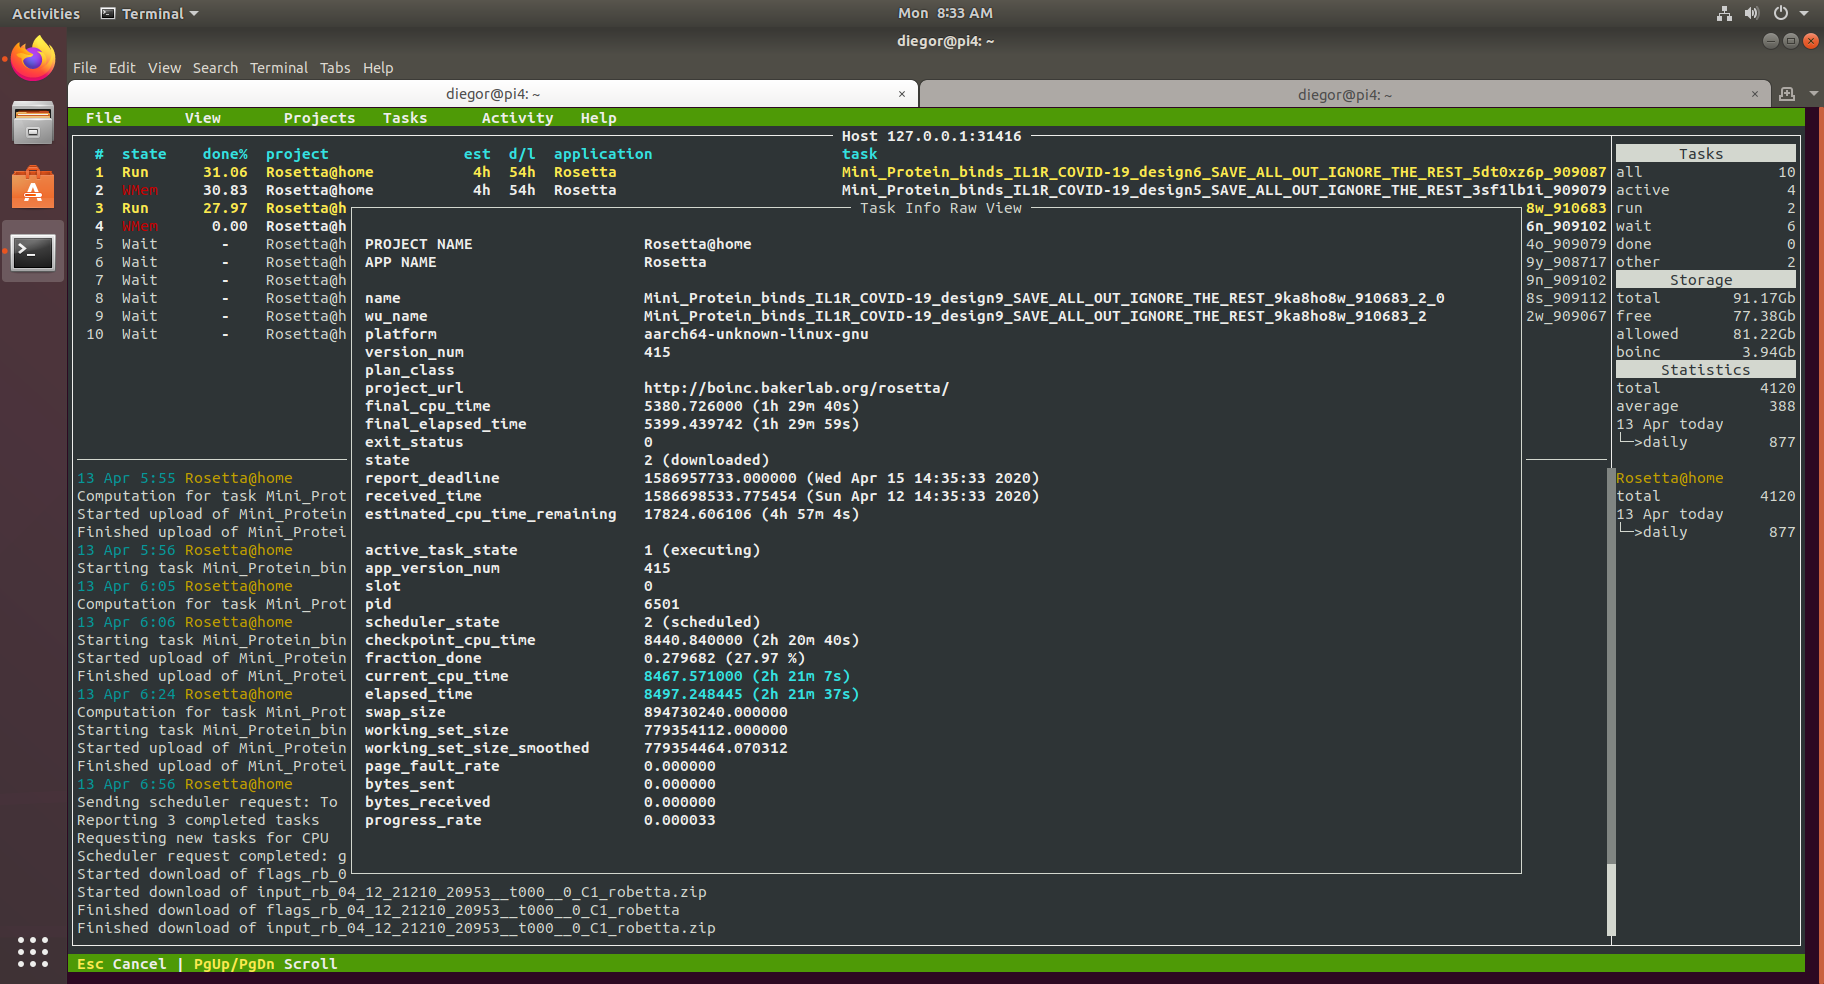
The Pi4 is slow.
Those are the specs.
As you can see it has 4 CPUs running at 1.5GHz. Not bad for a small board.
Solution: overclock the CPU.
Just follow this tutorial.
I did try to overclock it to 2GHz but it kept power cycling (likely due to
power consumption) so I stuck with 1.75GHz.
If you overclock it, I strongly suggest something to cool down the CPU.
I have a Fan SHIM: a bit noisy
but it does the job.
High memory usage
Even I have the 4GB version, I found the Raspberry Pi4 to be very unstable
while doing computations. Memory is somehow limited and when processes use a
large amount of it, the OOM killer could be invoked killing processes that
make the system unstable.
Solution: create a swapfile
Like any other Linux distribution create swap space to use part of the hard disk as
“extention” of the memory. I created a 4GB swap file and it seems working OK.
“PEP stands for Python Enhancement Proposal. A PEP is a design document providing information to the Python community, or describing a new feature for Python or its processes or environment. The PEP should provide a concise technical specification of the feature and a rationale for the feature” (from PEP 1)
There are three kinds of PEP:
All PEPs are stored in a github repository and the list is in the PEP 0
Now, the main question is: “What are the most important PEPs that a Python developer should be aware of?” I went through the long list and I chose the ones that I think are important to know.
The must know PEPs without witch you cannot be considered a Python programmer are:
The following PEPs don’t fall into any category but it’s good to know their existence anyway:
The following PEPs instead will be split between Python versions (2 and 3) and they just represent an attempt to summarise the most relevant ones in order to pick peculiarities of the language itself. The version of python affected and some personal extra comments will be side noted.
print()
(from Python 3.X) in Python
2.X? That’s the module for youprint()
X if C else Y
try
constructs allow an else
statement?Dict
is_close
enough :).format()
method (included in Python 2.6 as well)print
for debugging! Now all your
Python 2.X needs a huge refactoring for working in Python 3.X. Joking apart,
that’s the most common error when you try to run Python 2.X code using Python
3.X intepreter.raise
changes a bit. It’s worth
having a look__metaclass__
, Python 3.X
don’tabc
, no I haven’t forgotten the alphabet :)concurrent.futures
module provides a high-level interface for asynchronously executing callablesHave I missed anything? What’s your favourite PEP?
]]>With Github pages you can set up a website for every project you have on Github or you can set up a “personal” website (linked to your username.github.io repository on Github).
The underlying technology is Jekyll (yes, written in Ruby… :-/). You need to install it on your computer is you are migrating an existent website to Jekyll or if you want to customise your website even more. The reasons I move to Github Pages are summed in the following video
The old website was composed from:
The overhead for a simple website was simply too much: software updates and upgrades, schema migrations, backups, data restores, dying processes, dying processes and many other tasks which were time consuming.
The new website is composed from:
No databases, no schemas, no servers, no passwords, no hacks, no software updates, no dying processes, no downtime (well there might be, but Github will fix it for me) and backups are already included!
So if you already use Github, wait no more! Set up your website now!
If you want to migrate your existent website to Jekyll… Well, good luck! :) Joking apart, the process might not be so straightforward as a lot of things need to be ported/configured:
Well, if you have any question I bet you can find my contact or comment this post
Blogging with VIM
and publishing with git push
is just priceless! :)
micro:bit is a board that BBC will distribute to every year 7 student in the UK (early 2016, roughly 1 million units) and it will be shipped with micropython on it (more info). Hardware specs can be found here: it has a Cortex-M0, compass, accelerometer, 5x5 leds, bluetooth, uart, i2c, two buttons and other stuff you can use.
In a such tiny little board you can run python… well micropython, a fast implementation of Python 3 programming language that is optimised to run on a microcontroller.
So, what did we do? Once plugged the micro:bit to the USB, we can run python code through microrepl, a script that lets you run commands directly onto a connected micro:bit device. Alternatively you can use the browser based micro:bit editor, and start programming directly in your browser. Very neat!
My group (Gareth and myself), after exploring, experimenting, and testing the APIs, decided to do something with the 5x5 leds available. This is the code we have written literllay in few minutes:
import microbit
# It returns the brightness (0-9) depending on the position of the led
def brightness(x, y, t):
return (x + y + t) % 10
# Iterate the whole led matrix and set the pixel with the right brightness
def get_image(t):
for x in range(0, 5):
for y in range(0, 5):
microbit.display.set_pixel(x,y, brightness(x,y,t))
t = 0 # time
a = 1 # direction flag
# Start looping
while True:
get_image(t) # Set all the leds
t += a # Incrementing t
microbit.sleep(100) # Let's wait some time
if microbit.button_a.is_pressed(): #Check if the user presses the button
a *= -1 # Revert the direction
This is what it does (in real time the effect is much better):
And this is the slow motion:
When the user presses the button, it changes direction. It has been very good fun and I’m sure kids will love it: it is straightforward to use it, pretty intuitive and microrepl is very easy to use (it has autocompletion!)
]]>~/.bash_sessions/
directory.
Until here, nothing strage until you don’t play with HISTFILESIZE
and HISTSIZE
environment variables.
In /etc/bash_bashrc_Apple_Terminal
(which is called by /etc/bashrc
), the
following piece of code can cause some issues when you have set HISTFILESIZE
and HISTSIZE
to a very high values:
# Save new history commands.
if [ $BASH_SESSION_HISTORY -eq 1 ]; then
history -a
cat "$BASH_SESSION_HISTFILE_NEW" >> "$BASH_SHARED_HISTFILE"
cat "$BASH_SESSION_HISTFILE_NEW" >> "$BASH_SESSION_HISTFILE"
# Empty this session's history file to keep track of
# which commands have already been copied.
: >| "$BASH_SESSION_HISTFILE_NEW"
# Read/write the files via the history command so they
# are truncated as appropriate.
history -r "$BASH_SHARED_HISTFILE"
history -w "$BASH_SHARED_HISTFILE"
history -r "$BASH_SESSION_HISTFILE"
history -w "$BASH_SESSION_HISTFILE"
fi
I had the HIST*
variables set as:
HISTFILESIZE=1000000000
HISTSIZE=1000000
and this is what happened when I logout from the shell.
leonard:~ diegor$ logout
+ bash_update_session_state
+ bash_save_session_state
+ '[' 1 -eq 1 ']'
+ '[' -n /Users/diegor/.bash_sessions/97360883-85FB-4463-A9DF-1246FCD05977.session ']'
+ echo -n Saving session...
Saving session...++ date
+ echo echo Restored session: Mon Jul 13 08:23:07 BST 2015
+ declare -F bash_session_save_state
+ '[' 1 -eq 1 ']'
+ history -a
+ cat /Users/diegor/.bash_sessions/97360883-85FB-4463-A9DF-1246FCD05977.historynew
+ :
+ history -r /Users/diegor/.bash_history
Looking at the help of history, it is stated:
The `-w' option writes out the current history to the history file;
`-r' means to read the file and append the contents to the history list instead.
which means: if you HIST*
size are very high, the size is going to grow a lot,
with some implications (see three bullet points below)
At this point you observe the following things:
Saving session...
~/.bash_session
is increasing overtime: every time you logout it increases by the size of the history file (in my case was 20MB)My suggestion is NOT to set those variables and let OSX deal with them.
IHTH
]]>Nothing, nada, tabula rasa.
I couldn’t boot to Linux unless I went to the kind of BIOS menu and selected the Linux partition. After spending few days after this, I bumped into this comment in a stackoverflow post. It states:
“Yes! Renaming worked for me! I mounted the efi partition and copied the files ../EFI/ubuntu/grubx64.efi to ../EFI/Boot/ and to /EFI/Microsoft/Boot and changed the name of the file as follows. In the ../EFI/Boot directory I overwrote the bootx64.efi with the file and in the ../EFI/Microsoft/Boot I overwrote the bootmgfw.efi with the file. That was all I think. Thank you very much! - user296880 Jun 23 ‘14 at 20:28”
Well user296880, it did work for me too! Renaming file under the hood is really the last resort. A new upgrade might wipe everything and have to start again but I accept the risk.
Searching a bit better I also bumped into this other post which explains exactly my situation.
Said that, really good luck with that.
]]>git rebase -i
pick
to reword
on the line for the incorrect commit.git push --force
This method will rewrite the history of your repository. If someone pulled/fetched from the repo between the commit with the wrong message and when you correct it, he/she could have some issues. It would be useful to communicate to anyone involved about your action.
]]>$ setxkbmap
That’s it.
]]>$ echo $STY
If you are in a screen session, you’ll see something similar to
$ echo $STY
5413.ttys001.leonard
If you aren’t, you’ll see nothing.
$ echo $STY
$